Water Blade Installation Guide

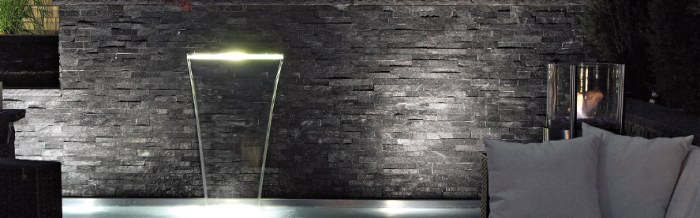
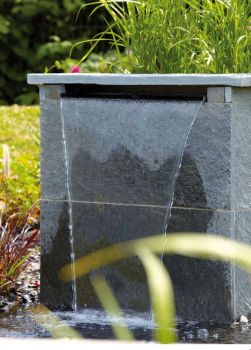
Cascading water blades are incredibly popular with architects, garden designers and private customers alike as these provide a highly attractive waterfall display. The cascading sheet of water offers a visual attraction but will also provide a wonderful water sound which can be used to drown out traffic noise or simply offer a relaxing garden element.
How do they work?
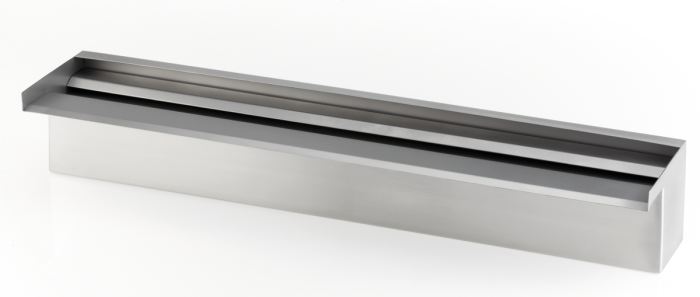
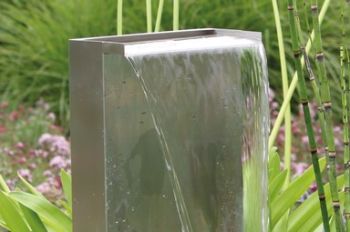
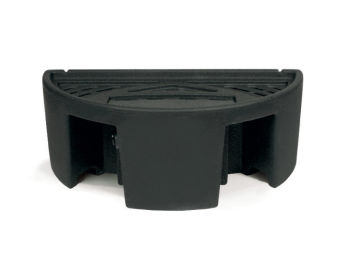
Water Blades are constructed from high grade stainless steel and are essentially a hollow box with a protruding front lip. Hidden inside of the blade are a bank of special baffle plates. Water is pumped into the blade and the baffle plates spread and tranquilise the water across the full width of the blade before escaping out of the front lip. The tranquilised water sheet then cascades down into a reservoir or pond, back to the submersed pump for recycling back up to the blade.
So what do I need?
To help you design and build your own cascading feature, we provided a step-by step guide below to help you select the correct items for your own installation.
1. A wall.
Water blades are usually mounted into a wall which could be made from a variety of materials, for example; wooden sleepers, plywood and batten, bricks or blocks. The blade is then mounted inside of the wall and usually, the faces of the wall are clad in a material to finish off the wall. Split slate mosaic tiles are hugely popular as a method of cladding the wall but tiles, render or brick slivers etc are also ideal. The front lip of the water blade must protrude out of the wall at least 3cm so that the water will fall down clear of the wall face.
2. A Water Blade.
Firstly, decide on the width of blade you would like. Water Garden offer Water Blades in widths of 30cm, 45cm, 60cm, 90cm, 120cm and 150cm. We also offer a standard front lip of 6cm or an extended lip of 12cm. If the wall is being clad with a material less than 3cm thickness, then a standard lip should be fine (as the lip will stick out of the wall by 3cm). If you prefer to have the lip sticking out further or the blade needs to sit deeper into the wall, the extended lip version may be more useful.
The next point to consider is how high you want the blade mounted above the pool or reservoir. As a general guide, we suggest lifting the blade no more than 1 metre above the water surface. It is perfectly fine to lift a bit higher (or indeed lower) but we find that the falling water sheet will start to break up quite dramatically the higher you go, which is not as attractive as a continuous sheet.
3. A Water Container.
Water blades are a ‘closed loop’ feature. In other words, the same water is recycled round and around by the pump without the need for mains water (other than the occasional top-up). So, we need a vessel of water which will hold plenty of water to ensure the pump is always submersed and to account for splashing and evaporation. If you already own a pond and you are building a wall on its edge, then this becomes your ‘reservoir’. If you are building a stand-alone water feature, then you will need to consider the separate reservoir.
The three most common methods for creating the water container are as follows:
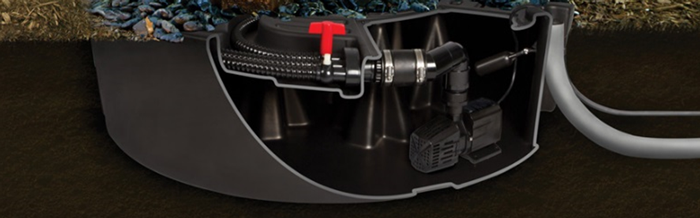
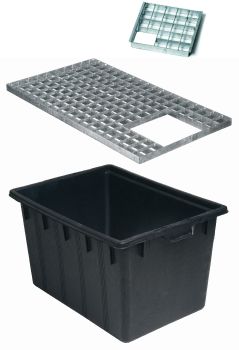
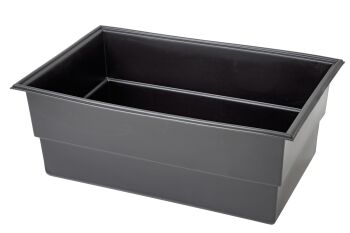
Purpose build Reservoir. This is a plastic tub, usually supplied with a safety grid and pump access hatch. This can be buried or built around to disguise. Usually the pump is submersed into the tub, then the grid is covered over with decorative stones.
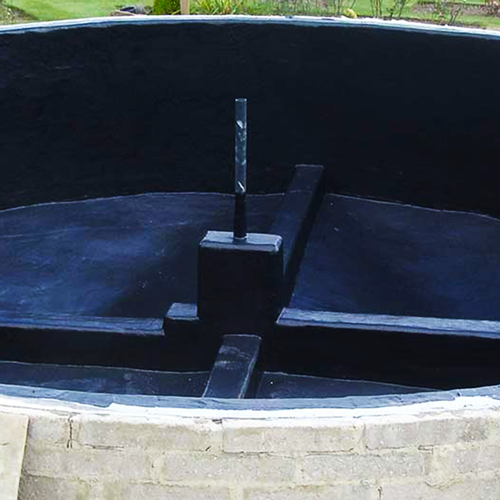
Hole and Rubber Pond Liner. You can simply dig a hole then fit a protective underlay and a rubber liner, essentially creating a small pond. This is easy to do but consideration needs to be taken in order to decorate and disguise the perimeter (black rubber liner does not look particularly attractive).
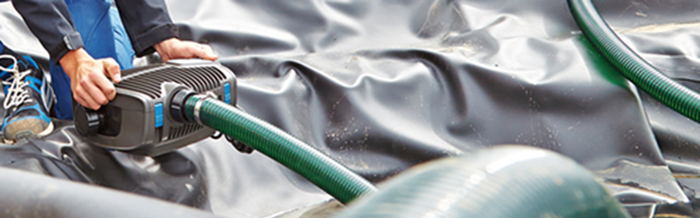
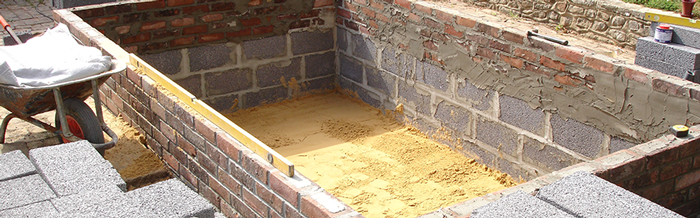
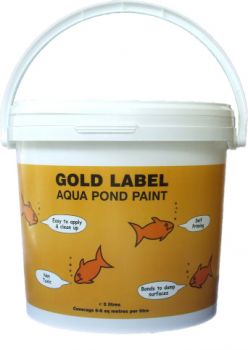
Concrete and block. Probably the most adaptable solution is to pour a concrete base, then build up the sides of the reservoir using concrete blocks. Once built, use a waterproof render to seal the insides and finally use 3 coats of specialist Pond Paint to create a fully waterproof internal pool. This may involve employing the services of a local builder but the end result will look great. We suggest passing a 25mm diameter stainless steel pipe through the rear wall of the reservoir so this pokes out 3” or so either side of the reservoir. The flexible 25mm pond hose can then be connected to the pump, both sides of the steel pipe and water blade and then secured with hose clips. This keeps the pump connection low down and discreet in the reservoir.
How big should the reservoir be?
The answer to this question partly depends on the width of the blade and also how high you are lifting the water. As the sheet of water cascades downwards, it will hit the water or pebbles etc and potentially create splash. If the reservoir is too small to catch the water splash, it could drain itself dry very quickly and possibly damage the submersed pump.
As a general guide, we suggest that the reservoir is around 15-30cm wider than the blade on both the left and right hand side. If a cross wind catches the water sheet, this should be enough to cater for this. From the wall facing coming forwards, we suggest the reservoir should be around 60-80cm. This should capture the majority of splash. With regards to water depth, we ideally recommend a depth of 50-60cm if possible. This will allow the pump to sit on the base of the reservoir with ample water above.
So for example;
A 60cm wide water blade should have a reservoir of around 90-120cm wide, 60-80cm from wall face coming forward and a water depth of around 50-60cm.
4. Water Pump.
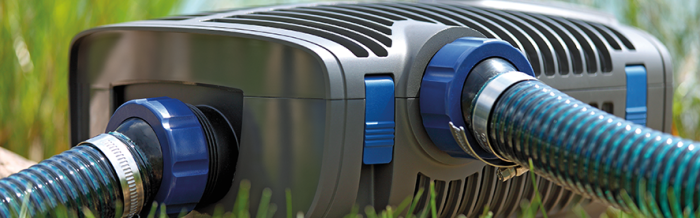
One of the most common mistakes made with water blades is the poor choice of water pump. If the flow rate is too little, this may result in a veritable dribble coming out of the blade. Unfortunately, many suppliers simply do not understand pump selection and we are often called to select the correct pump the second time around.! When you force water through a hose or pipe, you will lose some of the water flow due to ‘frictional loss’ which is resistance caused. Therefore, pipework needs to be taken into account when selecting the pump. Also, water flow will reduce as you lift the water uphill, which also needs to be accounted for.
All of our water blades have recommended pumps on their web page which we have carefully calculated to ensure more than sufficient flow to give you exactly the effect you require. Our hose and fittings kits also include a flow regulator so you can adjust the flow rate to give you the exact effect you want. Many people prefer a tapered, tranquil sheet of water whilst other like a fuller width, more dramatic display. We will give you both options from the same pump.
Where possible, we like to select a pump with a side outlet and this keeps the pump and flexible hose discreet and low down in the water. Pumps such as the PondoMax Eco and AquaMax Eco Classic are ideal and are also very energy efficient.
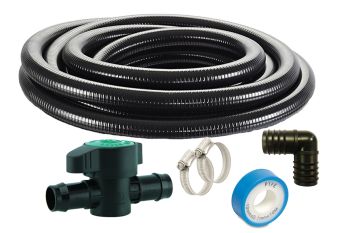
5. Hose & Fittings Kit.
Our hose & fittings kits include all the required connectors and flexible hose to get you from the submersed pump and up to your water blade. This also includes a means of adjusting the pump flow rate to give you exactly the right cascade effect.

Optional Extras.
We also offer some attractive additions which are not necessary to complete your build but will help to enhance these stunning features.
Illumination.
The OASE WaterFall Blades (30cm, 60cm & 90cm) can be fitted with an integrated warm white LED light bar which will illuminate the water as it escapes out of the water blade. Due to the way the illuminated bar is positioned, the light will travel partially down the water sheet which looks stunning at night.
For our standard water blades, supplemental Spotlighting can be used to up-light the wall and water sheet very effectively.

SilentSplash.
If you are covering your reservoir with a grid and then dressing with pebbles, slate chipping etc, the OASE SilentSplash is very useful for reducing water splash and also reducing the water noise levels. There are 3 models available and can be used with any of our water blades up to 90cm width.

Pond Paint.
Our special Pond Paint can of course be used to seal the internals of the rendered reservoir but, we also supply a transparent paint which can be used to seal the wall face itself. This is particularly useful on rendered walls or where slate or natural materials are being used to clad the wall face and will prevent potential blowing out if these surfaces are in constant contact with water.
Pond Filter.
If the water is enclosed (i.e. the reservoir is covered by a grid and decorative stones) a filter may not be required as the water is not exposed to daylight and the stones will act as a coarse filter as such, limiting debris and leaves from falling in the water. However, if the water surface is exposed to daylight/sunlight, then it is a good idea to install a filter to reduce algae bloom (green water). This no longer involved an ugly black box beside the pool as we can supply a fully submersible filter which can be placed directly in the reservoir pool.
The Filtral All-in-One Pond Filters are very easy to install as this is simply placed on the pool floor and then connected to an electrical supply. This is in no way connected to the main water blade pump, rather this simply operates 24 hours a day, silently and independently of the main pump. The Filtral includes its own small pump, a UV clarifier for purifying the water and mechanical / biological filter foams. The reservoir water is then pulled into the filter and is then processed and ejected back into the reservoir underwater.
So, to recap; What do I need?
- A Wall
- Water blade
- Water reservoir
- Submersible Pump
- Hose & Fittings Kit
- LED Lighting (optional)
- Clear Pond Paint (optional)
- Submersible Pond Filter (optional)
If you need any further guidance, just give one of our helpful team of experts a call and we can run through everything you need to create the perfect water blade feature.
Products in this range


![Helpful info]() Find out more
Find out moreHelpful info
Making things easier
Use our helpful information section to assit you on buy and maintaning your products.

