Watercourse Pump Selection Guide

A watercourse is what we refer to as a stream or “babbling brook” water-feature. It’s a self-contained cycle of water. You have a lower body of water, such as a pond or concealed vessel (e.g. a tub or plastic reservoir). Inside this is a pump which pushes water up through a hose or pipe to the top of a 'course'. The water then runs back down. This happens constantly to create the effect of a running stream, babbling brook, white-water rapids, or whatever other effect you’re going for.
In order to calculate the right pump for your watercourse, you will need to decide on two main factors; the height, and the width. There’s a third important measurement, but it doesn’t factor into the pump choice, so we will cover that last.
Been here before? Skip to the recap!
Height
Scale is everything after all...
In this instance when we say height, we’re talking about the height at which the stream begins. Water features are closed loops, so whatever water we take from the bottom has to get pushed up to the top. The higher that discharge point is, the more powerful pump you’re going to need to lift that water. Due to the way water pressure works, you don’t need to include the depth of the water vessel, sump, or pond you’re taking the water from. You only need the vertical height from the surface of the water, to the discharge point (the point at which the stream begins).
Width
The second aspect of a watercourse, is the width of it. Do you want a babbling brook 300mm wide? Or, a 4m wide white-water rapids? Don’t worry about being super precise; unless you’re making some sort of contemporary rill it’s unlikely going to be an even width. This measurement is going to decide what sort of flow rate we need to create the desired effect. We always use calculations that provide more flow than required, because it’s easy to adjust the pump down a little, but impossible to turn the pump up and beyond its manufactured capability.
The amount of flow you need is 1,000 litres per hour for each 10cm of width if you're looking for a humble trickle or babbling brook type effect. For a more dynamic display, 2,000lph per 10cm will produce a more healthy, turbulent flow.
For example:
I am making a 30cm wide stream and I just want a gentle flow of water for a tranquil water sound. If my stream is 30cm wide, then I need 3,000lph. For those of you what work in feet, that’s a 1ft wide stream requiring approximately 3,000lph, or 660 gallons per hour.
Or:
I have a 1m wide watercourse and I want a healthy volatile rush of water. I'll need 2,000lph per 10cm; which is 2,0000lph.
If you want full-blown white water rapids you may even want to go above and beyond 2,000lph for each 10cm of width.

Once we have the height and the flow we need, it’s time to find a pump. Flow rate by itself isn’t enough to choose a pump, because pumps lose flow rate the higher they have to push the water.
Imagine it was you pushing the water up hill. You’re carrying a bucket full of water. You fill it at the bottom of the hill and empty it at the top. Let’s say you never get exhausted from doing this. If we increase the size of your bucket, at some point you’re going to slow down because of the weight of the water. Due to the fact you’re slowing down, the rate at which you are delivering water slows down. If we keep increasing the size of your bucket, eventually you’re not even going to be able to get to the top of the hill. This isn’t a perfect analogy, but works to represent the “strength” of the pump, known as 'head'; which is measured in meters. The meters head of a pump is the maximum height it can deliver water before its flow rate tapers to absolutely zero.
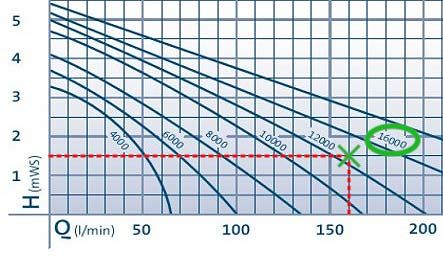
Pretty much all of the pumps we sell, (especially from the manufacturer OASE) have something called a 'performance curve'. This is a graph that shows what flow rate it will deliver at what height. The chart looks something like this:
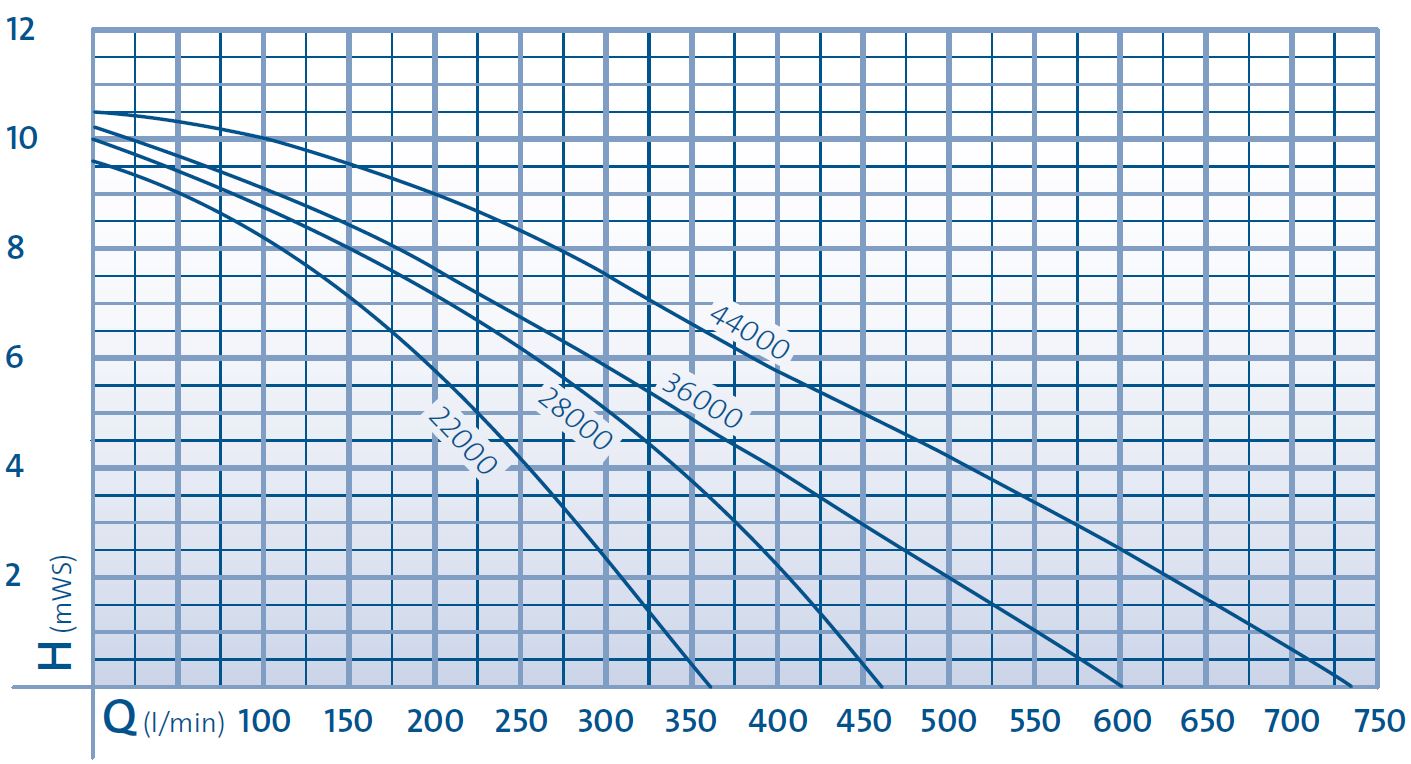
In order to find the kind of pump needed, we look up the left side (or whatever side measures ‘meters head’) until we get to the height of our water course. Then we travel across the graph until we get to the flow rate we need. In many instances these graphs are measured in litres per minute so you may need to divide your required flow rate by 60 (because there are 60 minutes in an hour).

Where do you end up?
If it’s over a line (representing the performance curve of a model of pump) then it’s outside the performance capability of that pump. meaning you need something more powerful. If it’s under the line, then you’re golden. Note that it’s generally bad practice to use a pump at the upper quarter of its performance, (utilising more than 75% of its max head / lift capability) as this puts a constant strain on the pump.
What else?
Well there’s one measurement we haven’t talked about yet, which is stream length. This doesn’t have any bearing on which pump you should choose because once the water is up at the top, gravity does all the work getting it to the bottom.
However, let’s step back and imagine an extreme case. Say your stream is a mile long. Any water you put at the top of that mile-long course is going to take time to return to the bottom. All the time it’s travelling down to get recycled back up by the pump, the vessel containing the pump is draining. Literally, the pump is evacuating all water up to the top of the stream. Eventually the water level in this vessel will decrease until is gone, the pump runs dry, and it’s an all-round miserable time.
This isn’t usually a problem for most garden watercourses, but it is something to keep in mind when creating one. The body of water at the bottom (also known as the reservoir), needs to contain enough water to still cover the pump completely when operating. This includes accounting for evaporation; watercourses can be very effective water heaters.
One last thing…
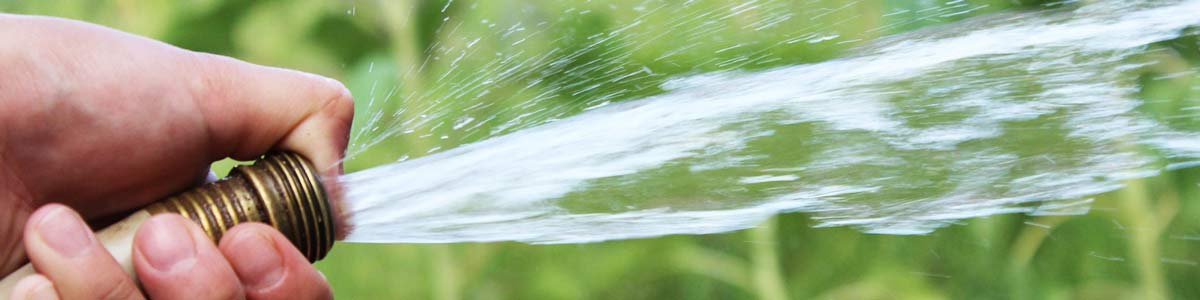
When choosing the hose or pipe for your pump, make sure you use the widest available; often the BSP outlet size on the pump itself is a good indication of the diameter pipe you should be using. It’s a very common misconception that narrower hose means higher pressure. This is probably because we’re so accustomed to the pressure we get from our taps and garden hose. Mains water pressure is usually 1 bar; which is 10m head. At these pressures, putting your thumb over a tap, or adding a spray nozzle to your hose, makes the water appear to increase in pressure. It’s actually the same pressure, just squirting though a smaller hole. If you do this by constricting garden pumps (which are generally a lot lower pressure), then you get something called frictional loss. Frictional loss occurs in every pipe, but when the pipe is too narrow to carry the water effectively, there’s a significant drop in the pressure and you get significantly less flow.
Going back to the analogy of climbing the hill with a bucket. Imagine you now have to do it while 400 other people are doing it at the same time as you. Now imagine you only have a very narrow path up the hill.
When the path was wide you could do the task without anybody bumping into you or getting in your way. With a narrow path, that’s going to happen often and slow you down. Traffic can only move as fast as the car in front of it.
So now you have your figures, and you know how to use performance curves, it should be a simple task of finding a pump that can handle the job. We have compiled our performance curves here and hyperlinked them to their product pages.
To Recap...
- How high is your water feature (where does the water start coming down from)? You don't need to include the depth of water.
- How wide is the channel? You need 1000 - 2000 litres per hour per 10cm. 1000lph is closer to a babbling brook, whereas 2000lph is a healthy more turbulent flow. It's difficult to convey "turbulence" so it's good practice to calculate with a higher flow, as a pump's flow can usually be throttled down.
- Use these two measurements on a pump performance curve. If you're above the line, the pump won't manage. If you're under the line it's a pump that will be up to the task.
- Try not to get a pump that's using most of its head (where you're in the upper 25% of its maximum lift capability).
- Try to use the widest hose or pipe diameter the pump allows to reduce frictional loss. After all, you can't push Niagara Falls through a drinking straw.!
![Helpful info]() Find out more
Find out moreHelpful info
Making things easier
Use our helpful information section to assit you on buy and maintaning your products.

