Need advice on this product?
Speak to one of our experts today 02392 373735
£1,490.39 inc. VAT
£1,241.99 exc. VAT
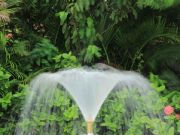
Fountain effect size achievable upto: H 90cm Ø 90cm (fountain height is fully adjustable via the supplied pump valve)
Find out more| Our Pondless Fountain Set 3 is supplied with an Aquarius Universal 12000 water feature pump. |  | |
| Tulip Jet - Water Film Nozzle 1 1/2" BSP | ||
| Ø cm | Height cm | |
| Aquarius Universal 12000 | 90 | 90 |
Riser Assembly Instructions
Screw the 1.5” to 1” reducing socket onto the top pump outlet.
Screw the 15cm riser into the reducing socket.
Screw the 1” socket onto the riser.
Screw the 1" nipple into the 1" socket.
Screw the 1" to 1.5" stainless steel reducing socket onto the 1"nipple.
Keep the fountain nozzle in a safe place ready for assembling to the riser assembly, once the lid has been fitted.
Dig a circular hole that measures 125cm in diameter and around 15-20cm deeper than the top water reservoir depth.
Skim the top soil layer around the reservoir hole so that water landing outside of the reservoir will naturally run back to the reservoir by gravity.
Place your reservoir in the hole and fill in any gaps around the edges with sand (Make sure the reservoir is level with the ground).
Using the protective underlay, lay this up to the edge of the reservoir on dry land but not beyond the top rim. The underlay is designed to protect the pond underlay from stones and root penetration.
Place your 3m x 3m pond liner over your reservoir making sure the reservoir is central under the liner.
Cut a circular hole in the liner that is around 12” smaller than your reservoir, so that the liner is well inside the reservoir rim. This hole will allow the water to easily return to the central reservoir.
Using a piece of sandpaper, rough up the surface around the top lip of the reservoir ready to bond the liner to it. Clean off the lip to remove any residue or debris.
Place two circular beads of pond liner sealant all the way around the edge of the reservoir, then carefully stick the liner to the reservoir making sure there are no air gaps. Use a wallpaper roller, rolling pin or fizzy drinks can to gently press down the sealant around the perimeter of the reservoir. Allow the adhesive to cure.
Place your Aquarius Universal 12000 Pump in the centre of your reservoir.
Place your pond overlay over your pond liner and reservoir, making sure to leave a hole for your fountain nozzle to protrude. The overlay material will prevent damage on the top side of the liner when your decorative stones are added.
Place the lid over the top of your reservoir.
Screw your Fountain Nozzle onto the top outlet of the pump riser.
Fill the reservoir with clean water.
Apply power to your fountain for testing and set to the desired water display height.
Once the fountain has been left running and account has been made for splashing, cut the outer perimeter of the liner to the final size required, ensuring that you do not cut inside the splash zone.
Place your decorative stones around the fountain nozzle covering the reservoir lid and pond liner. If your decorative stones are smaller than the lid holes, use chicken wire and/or a weed membrane to reduce the hole sizes to prevent the stones falling into the reservoir. Top the reservoir back up with clean water.
Apply power, sit back and enjoy your new pondless water feature.